Although it takes skill and careful planning, how to shingle a hip roof with 4 dormers may be satisfying, particularly if the roof includes four dormers. The job becomes more complex because of the numerous hills and valleys the dormers produce, necessitating careful alignment, waterproofing, and flashing. This comprehensive tutorial covers preparation, tools, materials, and step-by-step instructions for singling a hip roof with 4 dormers.
Understanding the Structure of a Hip Roof with Dormers
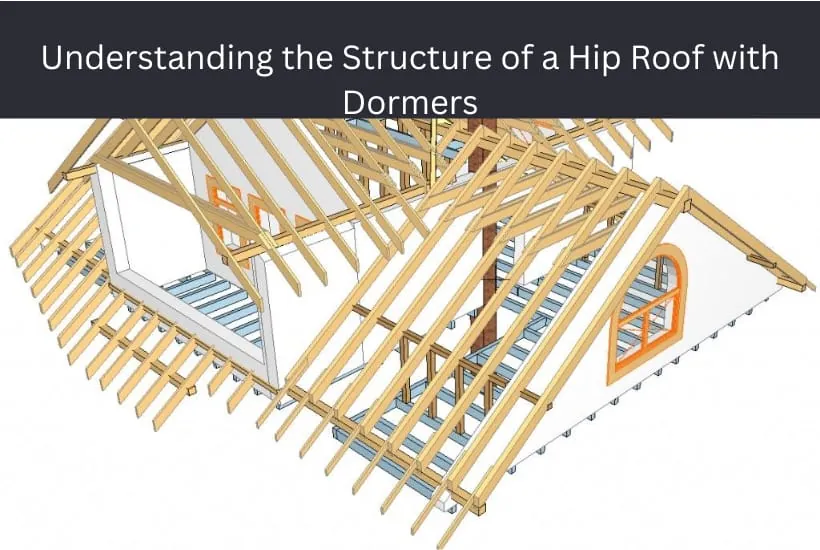
Dormers are vertical roof extensions with their own modest, frequently gabled rooflines, while hip roofs slope down on all four sides. Dormers give an attic or upper floor visual character, room, and light, but they also produce extra valleys and edges that require precise shingling. A good shingle installation depends on making sure that the overlap, flashing, and alignment are all correct because every valley, edge, and peak in a hip roof with dormers provides possible weak spots for water infiltration.
Materials and Tools Needed
Materials
- Asphalt shingles (three-tab or architectural style)
- Starter shingles
- Ridge shingles or ridge cap shingles
- Underlayment (synthetic or felt)
- Drip edge
- Ice and water shield (particularly for valleys and dormer areas)
- Flashing (metal or adhesive)
- Roofing nails
- Caulk or roofing cement
Tools
- Utility knife (for cutting shingles)
- Roofing hammer or nail gun
- Chalk line (for guiding shingle rows)
- Measuring tape
- Pry bar (for removing old shingles if necessary)
- Ladder and safety harness (for safety on steep slopes)
Preparation Steps
- Inspect the Roof Decking: Verify that the roof decking is smooth, sturdy, and free of rot. Before starting, replace any damaged decking.
- Install Drip Edge: To prevent water damage to the roof’s edges, install drip edges around the rakes and eaves. Work your way up, starting at the bottom and overlapping each section.
- Install Underlayment: Cover the whole roof with underlayment. Roll it out horizontally, beginning at the bottom, and overlap each row by a minimum of 4 inches. This layer aids in preventing leaks and offers further waterproofing.
- Apply Ice and Water Shield: Place water and ice shields along eaves, around dormers, and in valleys. This barrier must be added since these regions are particularly susceptible to leaks.
Step-by-Step Guide to Shingling the Hip Roof with Dormers
1. Start with the Starter Shingles
- Start by putting in a row of starter shingles along the roof’s eaves. Installing starter shingles at the edge will provide a stable foundation for the main shingles. By adding a layer of protection along the lower edge of the roof, they also aid in preventing water intrusion.
2. Install the First Row of Shingles
- Line up the bottom edge with the initial row and begin with a complete shingle. Secure the shingle with roofing nails, positioned approximately 1 inch above the cutouts for three-tab shingles (or as directed by the manufacturer for architectural shingles).
- Lay shingles horizontally across the roof, making sure each row is level with a chalk line.
3. Shingle the Dormer Valleys
- The places where the main roof and dormer roof meet are called valleys. Since leaks are common in these valleys, proper shingle installation is essential.
- Closed Valley: To create a waterproof seal, extend the main roof’s tiles into the valley and then overlap them with shingles from the dormer roof.
- Open Valley: To create an open valley, cover each side with shingles after installing metal valley flashing, leaving a few inches of the valley visible. By doing this, a channel is made for water to drain off of without leaking under the tiles.
- Because any gaps could result in leaks, make sure the shingles in the valley are cut precisely and connect perfectly.
4. Shingle Up the Dormer Roofs
- Working from the eaves to the ridge, shingle each dormer roof as you get to the dormers. For a seamless fit, cut the shingles to fit around the dormer edges, making sure they slightly overlap the main roof shingles.
- To stop water from leaking between the shingles and the dormer walls, use flashing along the walls. For a tight seal, use adhesive flashing tape or metal flashing.
5. Install Flashing Around Dormers
- Attach step flashing to each dormer’s side. Installed along the sidewalls, step flashing is made up of tiny metal pieces that are bent at a straight angle and overlap one another.
- Place a piece of step flashing with every new row of shingles as you work your way up the dormer’s sides. As a result, the shingles and dormer walls are sealed tightly.
6. Continue Shingling to the Hip Ridges
- Row by row, ascend the main roof and dormers. Cut shingles to fit along the ridge and overlap them when you get to a hip or ridge.
- To avoid any spaces where water could seep in, make sure the shingles overlap by half to two-thirds of their width for each row.
7. Install Hip and Ridge Cap Shingles
- Use pre-cut ridge cap shingles for the hips and ridges, or make your own out of three-tab shingles. Ridge caps ought to reach down along the hips and cover the roof’s apex.
- To get to the roof’s peak, begin at the bottom of each hip and overlap each cap shingle. Attach two nails to each side of each cap shingle, about an inch from the edge.
- Make sure there are no exposed nails at the top of the roof by overlapping the ridge shingles from each side to form a tight seal.
8. Final Waterproofing and Sealing

- Verify that all dormer areas, dips, and edges are properly covered and sealed.
- Apply caulk or roofing cement to flashing, vents, and any other places where water could seep in, particularly in high-risk areas around the dormers.
Tips for Shingling a Hip Roof with Dormers
- Safety First: Wear a safety harness and, if at all feasible, work with a partner because working on a hip roof with dormers can be difficult.
- Prepare for Rain: Keep an eye on the weather and refrain from beginning a roofing project if rain is predicted. Wet shingles can be slick and challenging to manage.
- Use a Chalk Line: To ensure that your shingles stay aligned, snap a chalk line every few rows to keep them straight.
- Trim Carefully: Cut shingles using a utility knife to exactly fit around valleys and dormers. Uneven or rough cuts may leave openings for water to seep in.
Maintenance Tips for a Hip Roof with Dormers
- Periodically maintaining a hip roof with dormers is necessary to keep the flashing and shingles in excellent shape.
- Examine Every Year: Because water and debris tend to gather near dormers and valleys, look for cracked, curled, or missing shingles.
- Clear debris: Get rid of any leaves, branches, or other debris that can retain moisture or harm the shingles.
- Re-seal Flashing: To keep a waterproof barrier, reapply caulking or roofing cement around flashing every few years.
- Look for algae growth: Moss and algae can form on shingles in humid climates. If necessary, use a mild cleaning solution; alternatively, think about algae-resistant shingles.
Conclusion
It’s a difficult but worthwhile endeavor to shingle a hip roof with four dormers. You can make sure that your roof is both long-lasting and aesthetically pleasing by following these guidelines and choosing high-quality materials. Your hip roof with dormers will remain safe and waterproof for many years to come with proper shingling, careful flashing, and routine maintenance.


